
Tile repair is the targeted restoration of damaged ceramic, porcelain, or stone tiles by stabilizing cracks, filling chips, re-bonding loose pieces, and renewing grout. Addressing issues early prevents moisture intrusion and subfloor damage. For homes and offices around Ras Al Khor, Service Zone UAE delivers tiles fixing that restores a like-new finish and extends floor life.
By Mohammed Ali — Owner, Service Zone UAE
Last updated: 2026-05-24
Quick Summary
Tile repair restores cracked, chipped, loose, or stained tiles without a full replacement. The core methods include chip filling, crack stabilization, re-bonding hollow tiles, spot replacement, and regrouting. In Oud Metha and greater Ras Al Khor, rapid repairs stop moisture, protect subfloors, and keep your space safe, clean, and attractive.
This complete, homeowner-friendly guide shows exactly how to diagnose tile problems, decide between DIY and pro help, and execute repairs safely. Use it to:
- Identify the problem fast: chip vs crack vs hollow vs failed grout.
- Choose the right fix: fill, stabilize, re-bond, replace, or regrout.
- Work smart: tools checklist, curing windows, and safety musts.
- Avoid rework: movement joints, humidity control, and leak checks.
- Know when to call Service Zone UAE for first-time-right results.
Local considerations for Oud Metha
- Plan weekday access around Oud Metha Metro Station rush windows; deliveries and debris hauling move faster mid-morning.
- High humidity spikes in summer demand longer curing (often 24–48 hours) before heavy foot traffic.
- Apartments near Karama Centre often have mixed tile batches; color-match test on a hidden area before committing.
What Is Tile Repair?
Tile repair is the focused restoration of damaged tiles and grout to original function and appearance. Typical tasks include filling chips, stabilizing hairline cracks, re-bonding hollow tiles, replacing broken pieces, and renewing grout to block moisture and dirt.
In practice, tile repair covers five repeatable jobs. Each protects your substrate, improves hygiene, and maintains resale value:
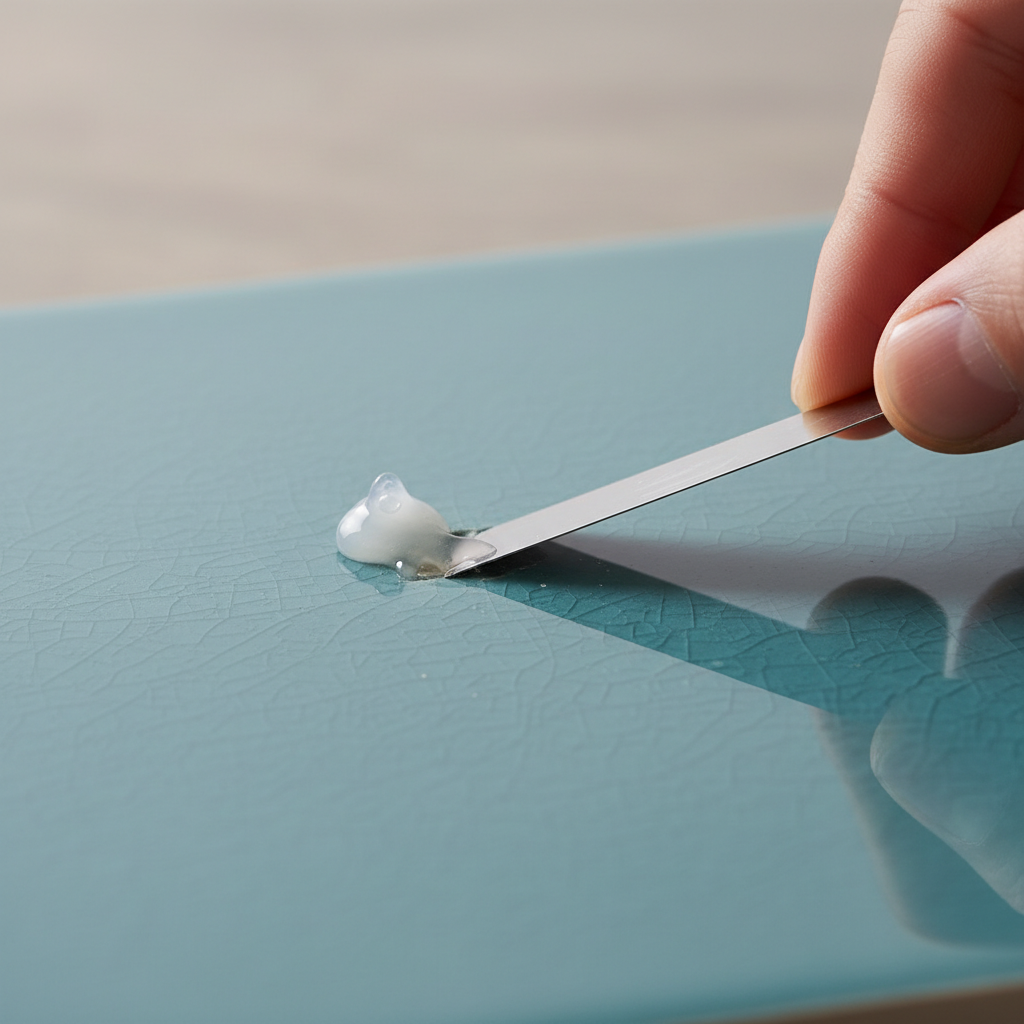
- Chip filling: Color-matched epoxy or acrylic repairs small chips (often under 6–8 mm) to stop spreading.
- Crack stabilization: Penetrating sealers and flexible fillers reduce crack propagation. Hairlines under 1 mm can often be disguised.
- Re-bonding hollow tiles: Injectable adhesives reattach loose tiles; good adhesion reaches 85–95% of the tile’s underside.
- Spot replacement: Remove and replace a broken tile, maintaining a 2–3 mm grout joint for movement.
- Regrouting: Clear out 3–4 mm of failed grout and re-apply sanded/unsanded or epoxy grout, allowing 24 hours to cure for light use.
Here’s the thing: most tile problems are symptoms. Moisture, substrate movement, and impact force are root causes. Fix the cause while repairing the tile and the result lasts much longer.
Why Tile Repair Matters
Prompt tile repair prevents water intrusion, mold growth, and subfloor decay. It also eliminates trip hazards, restores hygiene, and preserves property value. Timely fixes often take hours—not weeks—and avoid messy full-floor replacements.
Neglected cracks let water travel. Even 1–2 mm gaps can wick moisture, discolor grout, and mobilize salts. On balconies or bathrooms, that turns into efflorescence and, over months, loose tiles. Address damage quickly and you protect the assembly—tile, thin-set, membrane, and substrate.
- Safety first: Edge chips create 2–3 mm lips that catch shoes. Smoothing them reduces fall risk immediately.
- Hygiene: Open grout lines collect biofilm. Regrouting restores sealed surfaces that clean up in 30–60 seconds.
- Longevity: Stabilized cracks and re-bonded tiles commonly add 3–5 years to a floor’s service life when the root cause is addressed.
- Aesthetics: Color-matched fillers and grout renew a uniform look—the difference is obvious even from 6–8 feet away.
In our experience servicing apartments in Oud Metha and villas near Ras Al Khor, fixing a minor issue within 48–72 hours often prevents a multi-room tear-out later. The right 30-minute repair beats days of demolition.
How Tile Repair Works (Step-by-Step)
Effective tile repair follows a consistent workflow: diagnose, isolate, prepare, repair, cure, and protect. This sequence reduces rework, keeps dust under control, and ensures new bonds and grout reach design strength.
Step 1 — Diagnose precisely
- Map the damage: Mark chips, cracks, hollow spots (tap test), and grout failures. Note any 1–2 mm lips.
- Check causes: Look for plumbing leaks, balcony ponding, or failed movement joints (every 20–25 ft in large rooms).
- Moisture check: If grout darkens after 60 seconds of water, moisture is likely migrating under tiles.
Step 2 — Isolate the work zone
- Protect adjacent finishes: Cover 4–6 ft around the repair with rosin paper or drop cloths.
- Ventilate and control dust: Use localized extraction and mask off HVAC returns.
- Schedule downtime: Plan a 24-hour curing window for most grout and adhesives; heavy use often needs 48 hours.
Step 3 — Prepare surfaces
- Clean thoroughly: Degrease tiles and remove soap scum; even a 0.1 mm film reduces adhesion.
- Score and square: For replacements, remove grout 3–4 mm deep, then score tile into quadrants before lifting.
- Substrate ready: Scrape old thin-set to a flat plane; a 2–3 mm peak can telegraph through a brittle tile.
Step 4 — Execute the repair
- Chip filling: Mix tinted epoxy, overfill by 0.5–1 mm, level with a razor at a 10–15° angle.
- Crack stabilization: Open hairlines slightly with a blade, apply flexible filler, and feather 10–15 mm past ends.
- Re-bond hollows: Drill a 3–4 mm hole, inject adhesive until resistance, wipe squeeze-out, plug with tinted filler.
- Tile replacement: Butter the back to achieve 95% coverage; set with 2–3 mm spacers for alignment.
- Regrout: Pack joints diagonally, wait 10–15 minutes, then remove haze with a barely damp sponge.
Step 5 — Cure and protect
- Respect cure times: Light foot traffic after ~24 hours; rolling loads typically after 48–72 hours.
- Seal if needed: Many porcelains are non-porous; cementitious grout often benefits from sealing after 72 hours.
- Control humidity: Keep indoor RH between 40–60% for predictable curing and reduced efflorescence.
Need hands-on help? Our multi-trade team coordinates tile repair with trim work, thresholds, and door planing so everything closes and aligns post-repair.
Methods and When to Use Them
Choose the least invasive repair that restores function and look: fill small chips, stabilize hairline cracks, re-bond hollow tiles, replace broken pieces, and regrout stained or crumbling joints. Match method to cause for repairs that last.
Each method has a clear “best use” window. Use this quick map to match problem to fix:
- Chip filling: Best for corner or surface chips under ~8 mm. Ideal near baseboards or kitchen islands.
- Crack stabilization: Works for hairlines under ~1 mm without tile movement. If the crack grows weekly, investigate structure.
- Re-bonding: Hollow sound over 25–30% of a tile suggests voids; injected adhesives often recover full support.
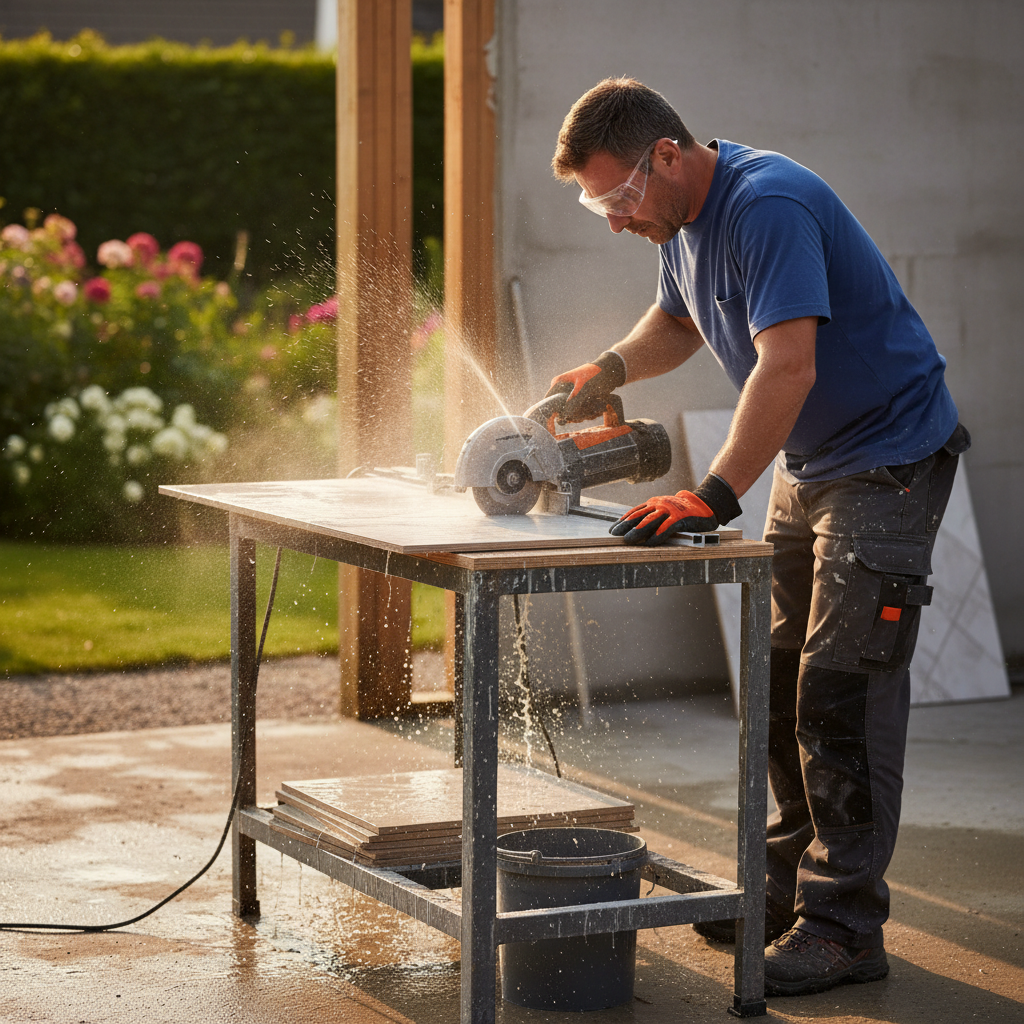
- Spot replacement: Use when a tile is fractured end-to-end or has >10–15% surface loss.
- Regrouting: Stained, pitted, or crumbling grout 2–3 mm deep should be replaced for hygiene and water control.
DIY vs Pro: process comparison
| Repair type | Best for | Typical time | Key tools | Risks if DIY |
|---|---|---|---|---|
| Chip fill | Small cosmetic chips | 30–60 minutes | Tinted epoxy, razor blade | Color mismatch, proud patch |
| Crack stabilize | Hairlines < 1 mm | 60–90 minutes | Flexible filler, sealer | Crack telegraphing back |
| Re-bond hollow | Voids under tiles | 1–2 hours | Drill, inject adhesive | Tile lift if overfilled |
| Spot replace | Broken tiles | 2–4 hours | Oscillating tool, wet saw | Edge damage to neighbors |
| Regrout | Failed/stained grout | 2–3 hours + cure | Grout saw, float, sponge | Haze and poor bonding |
If you see spreading cracks across multiple rooms, call a pro. That pattern usually means movement or moisture, not a single bad tile.
Best Practices that Prevent Repeat Repairs
The best tile repairs start with root-cause control: manage moisture, allow movement, and ensure full adhesive coverage. Add careful prep and cure discipline, and your repair is far more likely to last for years.
- Leak checks: Before any bathroom or kitchen repair, rule out plumbing seepage with 10–15 minutes of fixture testing.
- Movement joints: Use flexible sealant at perimeters and transitions; large rooms need joints roughly every 20–25 ft.
- Coverage matters: For floors, aim for ~95% mortar coverage under each tile—back-butter large formats.
- Humidity control: Keep RH near 50%; our storage service helps clear rooms so AC balances properly during curing.
- Surface prep: Cleanliness is non-negotiable—debris over 1 mm can create a hollow point under brittle porcelain.
- Seal smart: Seal natural stone and most cementitious grouts after they reach full cure windows.
- Color-matching: Always sample on a spare tile or an inconspicuous area; dry colors read 5–10% lighter than wet.
Working in an occupied apartment in Oud Metha? We’ve found a 6–8 ft protection zone and labeled pathways reduce cleanup time by 30–40% while keeping families mobile during repairs.
Tools and Resources
You only need a focused kit: diagnostics (tape, level, tapping tool), prep (oscillating tool, grout saw), repair (epoxy, flexible filler, injectables), and finish (float, sponge, sealant). Add PPE for dust and wet-cutting safety.
- Diagnostics: Straightedge, blue tape, tapping tool (coin works), moisture meter if available.
- Prep tools: Grout saw, oscillating tool with grout blade, razor knife, scraper, vacuum.
- Repair kit: Color-matched epoxy, flexible crack filler, injectable tile adhesive, replacement tiles, spacers (2–3 mm).
- Setting tools: Notched trowel (6–10 mm for floors), rubber mallet, tile leveling clips (for large formats).
- Finishing: Grout float, sponge, microfiber cloth, breathable sealer.
- Safety: Eye protection, gloves, hearing protection, and masks for dust and wet-sawing.
For a visual primer on tile installation elements, this concise overview on tile installation basics is handy when you’re brushing up on troweling and spacing. For grout hygiene fundamentals, see this tile and grout cleaning guide. To see how a local service approaches full repairs, review our tiles fixing process.
Room-by-room checklist
- Kitchen: Check transitions to wood; flexible sealant at the metal strip prevents edge chipping.
- Bathroom: Inspect corners and niches; switch to 100% silicone in wet zones instead of grout.
- Balcony: Ensure slope of 1–2% to drains; standing water beyond 60 minutes indicates a drainage problem.
- Entryways: Add a walk-off mat 2–3 steps long to cut grit that causes micro-chipping.
Case Studies and Local Examples
Local projects show how root-cause fixes make repairs last. When we pair tile work with moisture control, movement joints, and careful color-matching, restored floors keep their look and bond strength month after month.
Oud Metha apartment — spreading hairlines stopped
- Problem: Hairline cracks radiating 300–400 mm from a kitchen island leg.
- Root cause: Point load and minor subfloor deflection.
- Fix: Stabilized cracks with flexible filler, re-bonded two hollow tiles, and installed a discrete movement joint at a threshold.
- Outcome: No new cracks after 6 months; cleaning time per spill dropped to under 60 seconds.
Ras Al Khor villa — balcony re-bond and regrout
- Problem: 20–30% hollow tiles and whitening on grout (efflorescence).
- Root cause: Ponding water and insufficient adhesive coverage.
- Fix: Injected adhesive, replaced 4 tiles, improved slope, and regrouted with a denser mix; sealed after 72 hours.
- Outcome: Hollow sound eliminated; drainage clears water within 30 minutes after rainfall.
Office pantry near Oud Metha — chip repairs under foot traffic
- Problem: Multiple 4–6 mm chips at the fridge edge and under seating.
- Fix: Fast color-matched epoxy fills and polishing passes; added a 2–3 step walk-off mat.
- Outcome: Edges smooth to the touch; no new chips over the next quarter despite ~200 daily crossings.
When repairs are part of a broader plan, results accelerate. For example, pairing tile work with fresh paint and SPC flooring upgrades transforms dated spaces quickly, while smart sequencing cuts total downtime by 20–30%.
How We Work With You
Service Zone UAE pairs fast diagnosis with first-time-right execution. We protect your home, control dust, and coordinate trades so tile repairs finish cleanly—often within a day for localized issues.
- Site walk: 20–30 minutes to map issues, test hollows, and check moisture.
- Clear plan: You’ll get a scope, sequencing, and expected cure windows (often 24–48 hours before heavy use).
- Multi-trade support: Need trim, repainting, or threshold changes? We coordinate with our carpentry team and painters.
- Protected spaces: Pathways, coverings, and labeled zones keep life moving during work.
- Handover: We provide aftercare tips and a cleaning schedule that preserves the new finish.
Managing a larger refresh? Our storage service helps decant rooms so crews can work room-by-room, keeping timelines tighter and curing conditions consistent.
Frequently Asked Questions (FAQ)
These short answers address the most common tile repair questions in Dubai homes and offices. Each response is direct and practical so you can act with confidence.
Can a chipped tile be repaired without replacing it?
Yes. For small chips (often under 6–8 mm), a color-matched epoxy fill works well. Overfill slightly, level with a razor at a low angle, then polish. The patch blends better if you test color on a spare or hidden tile first.
How do I know if a tile is hollow or loose?
Tap the tile lightly with a coin and listen. A hollow or drum-like sound indicates voids. If more than 25–30% of the area sounds hollow, consider adhesive injection or replacement. Check nearby grout for cracks or debris lines too.
What’s the difference between regrouting and sealing?
Regrouting removes failed grout and installs new material to restore structure and hygiene. Sealing adds a protective barrier—usually after grout cures—to resist stains and moisture. Many porcelains need no sealer, but cementitious grout often benefits from it.
Is tile repair suitable for outdoor balconies in Dubai?
Yes, provided water management is correct. Ensure a 1–2% slope to drains, use flexible movement joints, and re-bond any hollows. Many balcony issues stem from ponding; repairs last when drainage is restored and tiles are fully supported.
Key Takeaways and Next Steps
Act early, match the repair to the cause, and control curing conditions. When in doubt—especially with moisture or movement—bring in a pro team to stabilize the assembly and prevent repeat failures.
- Start small, fast: Chips and hairlines are quick wins—often under 90 minutes.
- Control moisture: Leaks and ponding fuel most recurrent problems; fix sources first.
- Allow movement: Expansion at perimeters and transitions avoids re-cracking.
- Call us when needed: For complex patterns or multiple rooms, our crew coordination shortens timelines.
Ready to restore your floor? Book a friendly walk-through in Ras Al Khor. We’ll map the issues, propose the cleanest fix, and get your space back to normal—fast.
Soft CTA: Planning a broader refresh? Pair tile repair with painting services and durable SPC floors for a dramatic before-and-after in days, not weeks.